How to best track time in Asana
Last updated on: December 23, 2021
Asana is a work management platform meant to help teams manage their goals, projects, and everyday tasks.
But, just like with any other app, the best way to make the most out of Asana is to make sure you spend your time on it productively and efficiently.
Asana doesn’t have time tracking features, so you’ll need an external time tracking app. Clockify integrates with Asana, enabling you and your team to track time on tasks straight from Asana, for free.
Table of Contents
How Asana works?
Asana is an all-inclusive work management platform with straightforward task and project management features – within it, you can keep track of the progress you make on projects and tasks, exchange files, comments, and notes, keep track of your deadlines, as well as assign tasks to your team members.
In general, when creating a project in Asana, you can choose between:
- The List Layout
- The Board Layout
The app also has several sections meant to help you manage your work: “Home”, “My Tasks”, “Inbox”, and “Portfolio”.
Home
The “Home” section in Asana serves as a base for your entire team – here, you can select the project you currently want to work on, and then manage and keep track of all your team’s work through several tabs: “Board” or “List” (depending on the chosen layout of your project), “Timeline”, “Calendar”, “Conversations”, “Progress”, and “Files”.
“Board” in the Board layout
The Board layout offers you a “Board” tab with cards and columns meant to help you keep track of your work.
Here, you can carry out your work and track your project’s progress through the Kanban approach – you can create and move custom cards that represent your tasks across custom columns that represent your level of progress with said tasks.
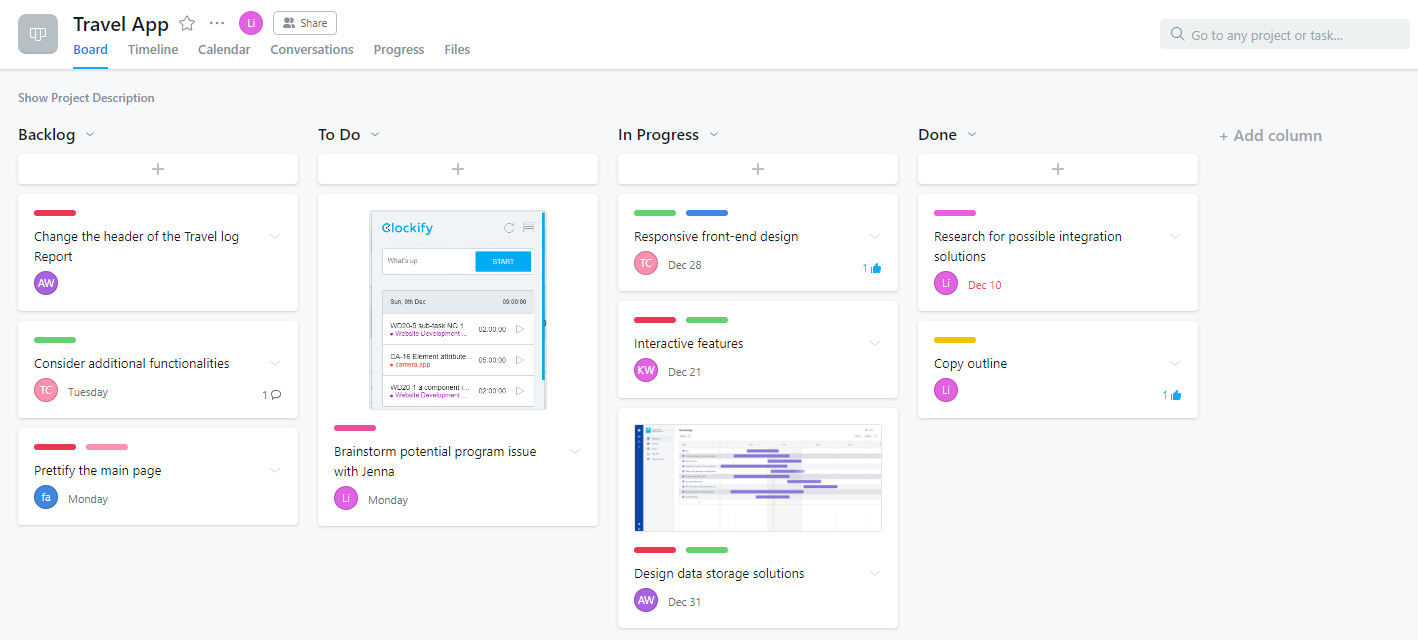 The columns users often choose to create are:
- “Backlog” column – for ideas you have yet to decide whether you’ll set into motion
- “To Do” column – for tasks that await you in the future
- “In Progress” column – for tasks that you are currently working on
- “Done” column – for tasks you’ve finished so far
Once you create the cards that represent your tasks, you’ll be able to add additional information to them, by:
- personalizing them with colors and defined tags
- assigning them to particular members of your team
- adding attachments
- duplicating and merging them together
- marking particular tasks as dependant on other tasks
- converting a task to a project
- adding descriptions, notes, and comments to them
Once you’ve added and set up your cards, you can move them across the columns, to indicate whether they’re just Backlog ideas, a part of your To Do list, currently In progress, or Done.
“List” in the List layout
The List layout offers you a “List” tab where you can keep track of your work, by managing your to-do items.
Here, you can carry out your work and track your project’s progress by making lists – you can list tasks and order them by priority.
Just like in the “Board” tab of the Board layout, you can also personalize and further manage your project’s tasks with tags, attachments, sub-tasks, description, notes, comments, and more.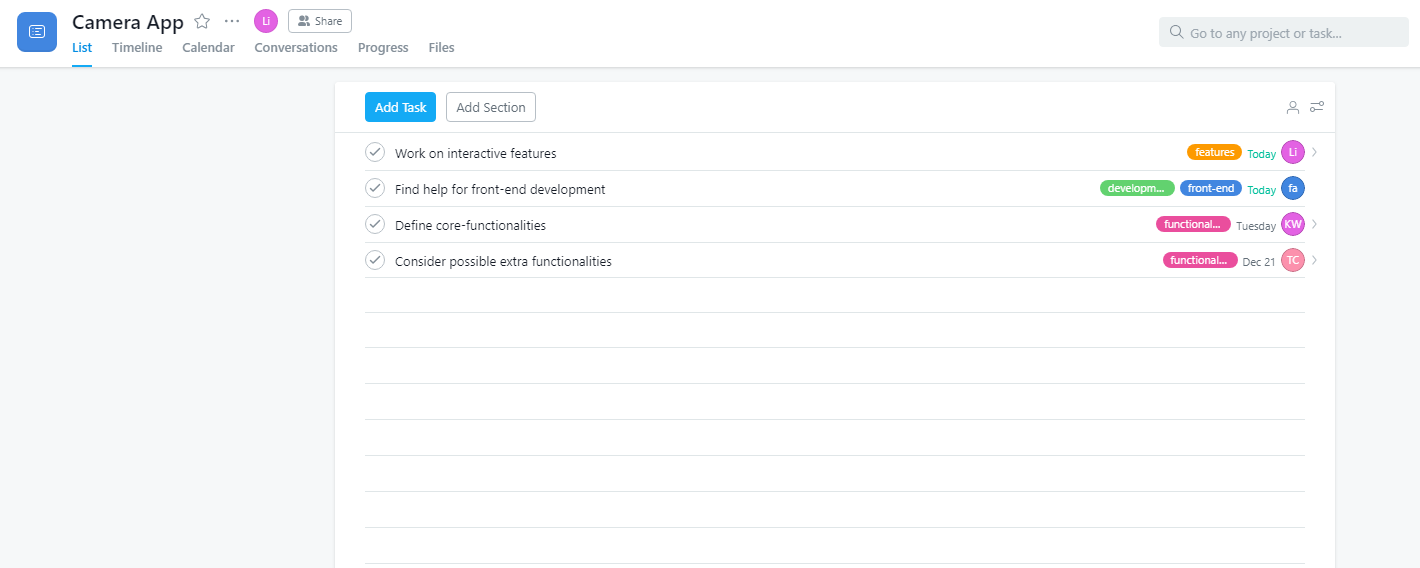
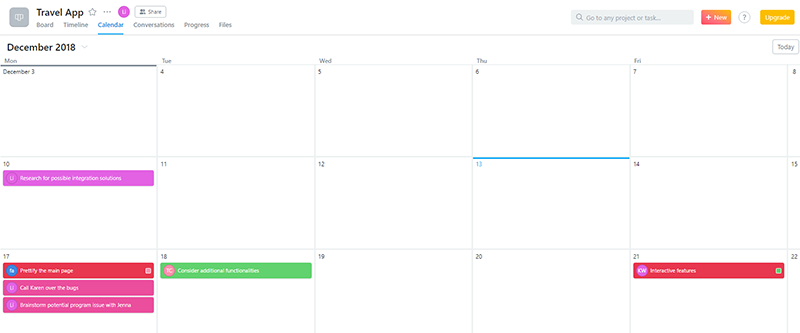
Calendar
Within the “Calendar” tab, you can view all your tasks within they days they’re due to be done – as soon as you mark your Asana tasks with due dates, they appear in the Calendar and you get a clear overview of the days you have before your deadline.
Alternatively, you can add tasks to your Calendar directly in this tab.
Timeline
Within the “Timeline” tab, you can view all your tasks and deadlines stacked against each other, so it becomes easy to sort out your priorities and identify tasks with the nearest deadlines.
Here, you can also view dependencies between tasks, so you can anticipate future problems easier.

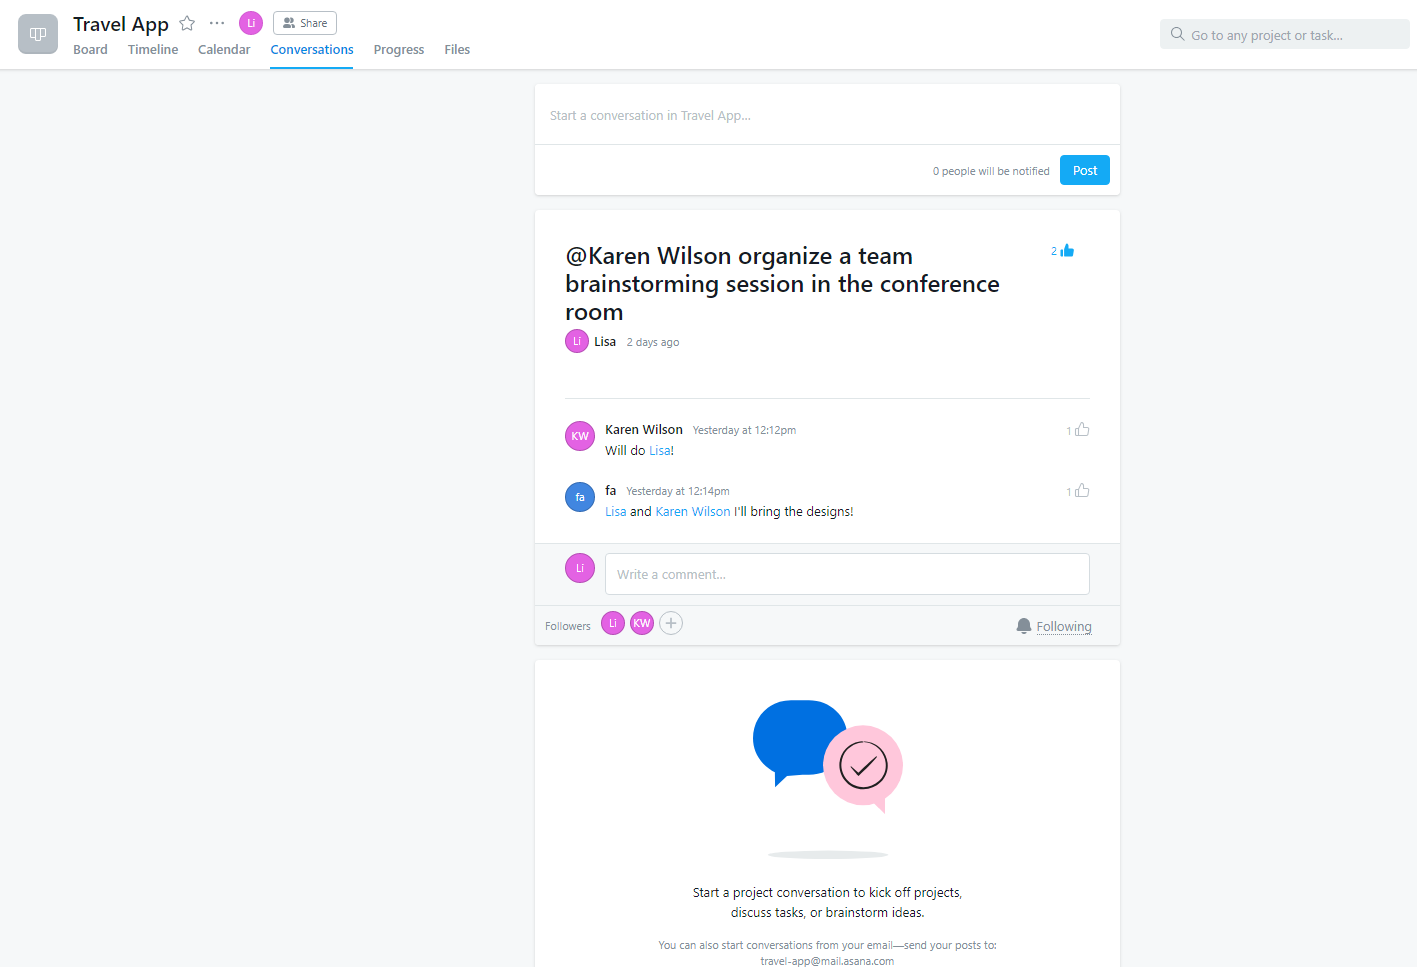
Conversations
The “Conversations” tab holds all your conversations with other team members. This includes all your chats, remarks, brainstorming sessions, and the ideas you’ve exchanged during the course of the project.
Progress
The “Progress” tab allows you to announce problems and set status updates, in order to quickly inform all team members about your progress and possible obstacles you’ve encountered in your work.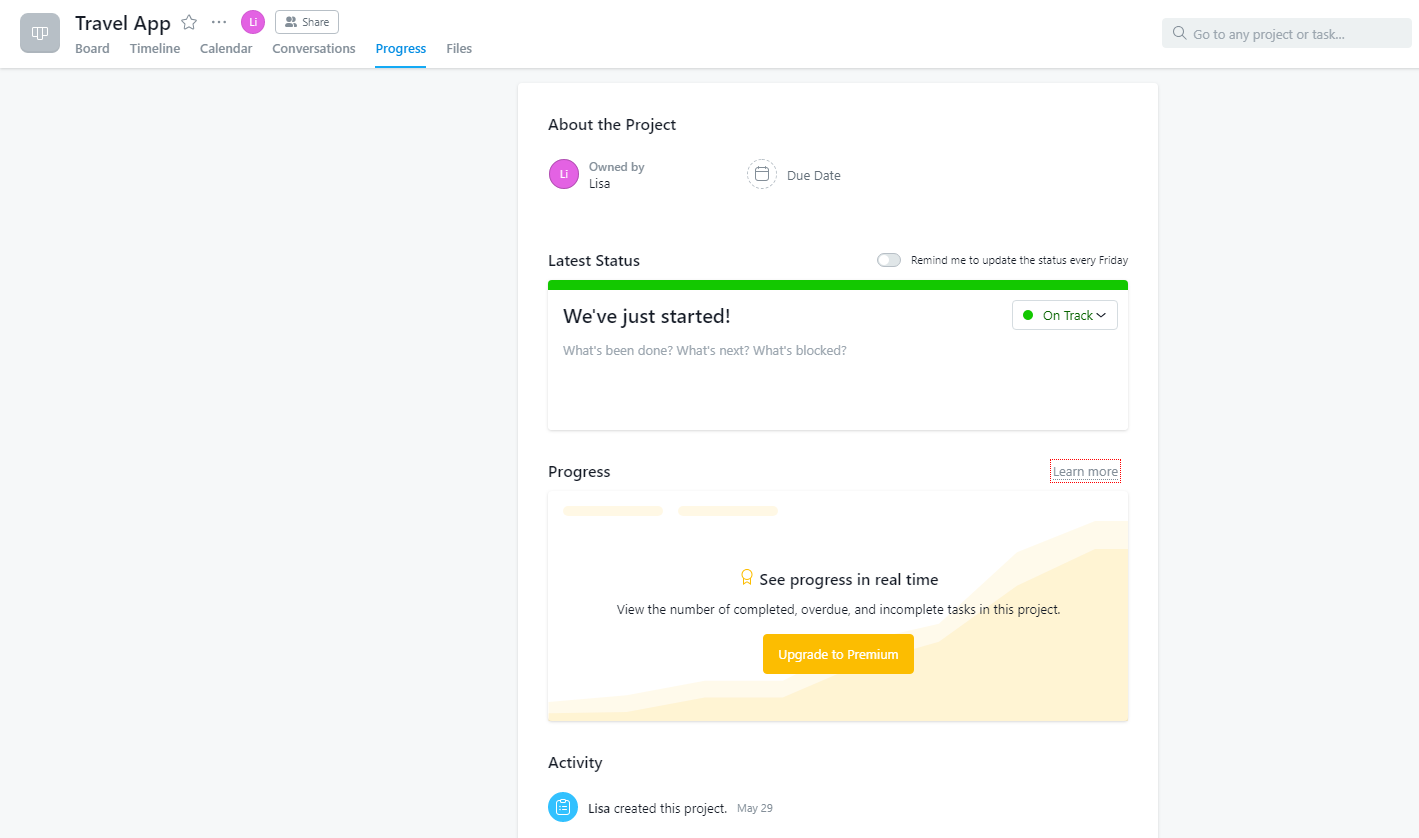
Files
The “Files” tab allows your team to quickly access all the attachments you’ve added to Asana, across all tasks.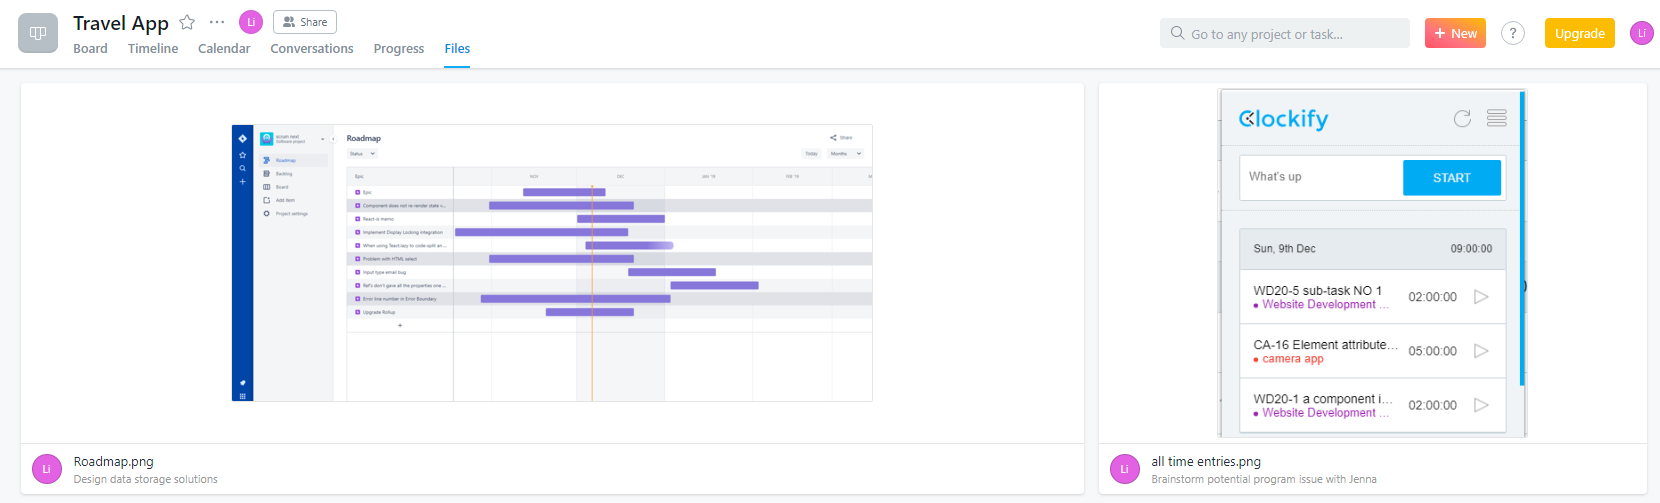
My Tasks
The “Home” section serves as a base to your entire team, and the “My Tasks” section serves as your own personal base – it lets you manage all the tasks assigned to you from one place.
As soon as you add a personal task to Asana, or when a task is assigned to you, it immediately appears in this section – you’ll be able to see all your newest tasks and see what tasks await you in the future. Alternatively, you can add new tasks directly in this section, and treat the section as a straightforward to-do List.
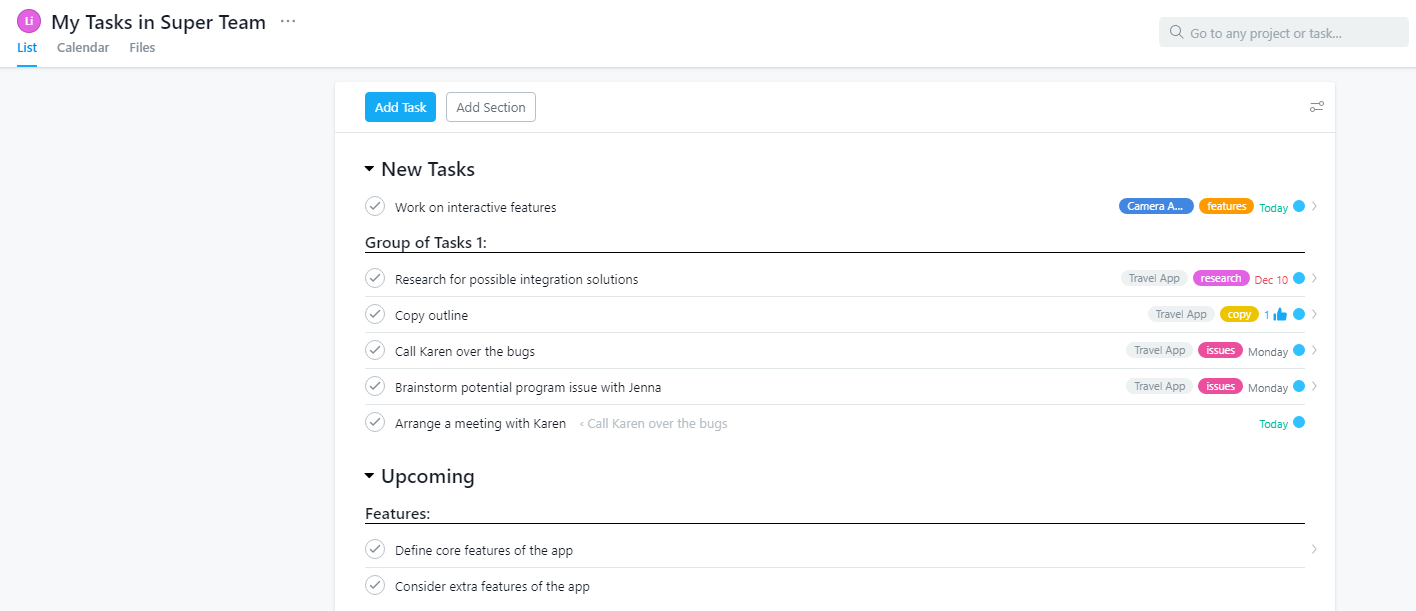
Here, you can also add sub-tasks that further break down your work into manageable chunks. Another great feature is that you can create Sections and group related tasks and subtasks into a specific section.
Within the “My Tasks” section, the “Calendar” tab shows you a daily breakdown of your work, with due dates for all the tasks assigned to you, while the “Files” tab shows you all the files attached to tasks that are assigned to you.
Inbox
The “Inbox” section shows all the conversations on work you’re personally following.
Here, you’ll be able to manage your invites, assign tasks to new team members, as well as have a straightforward overview of all the conversations you are partaking in or following.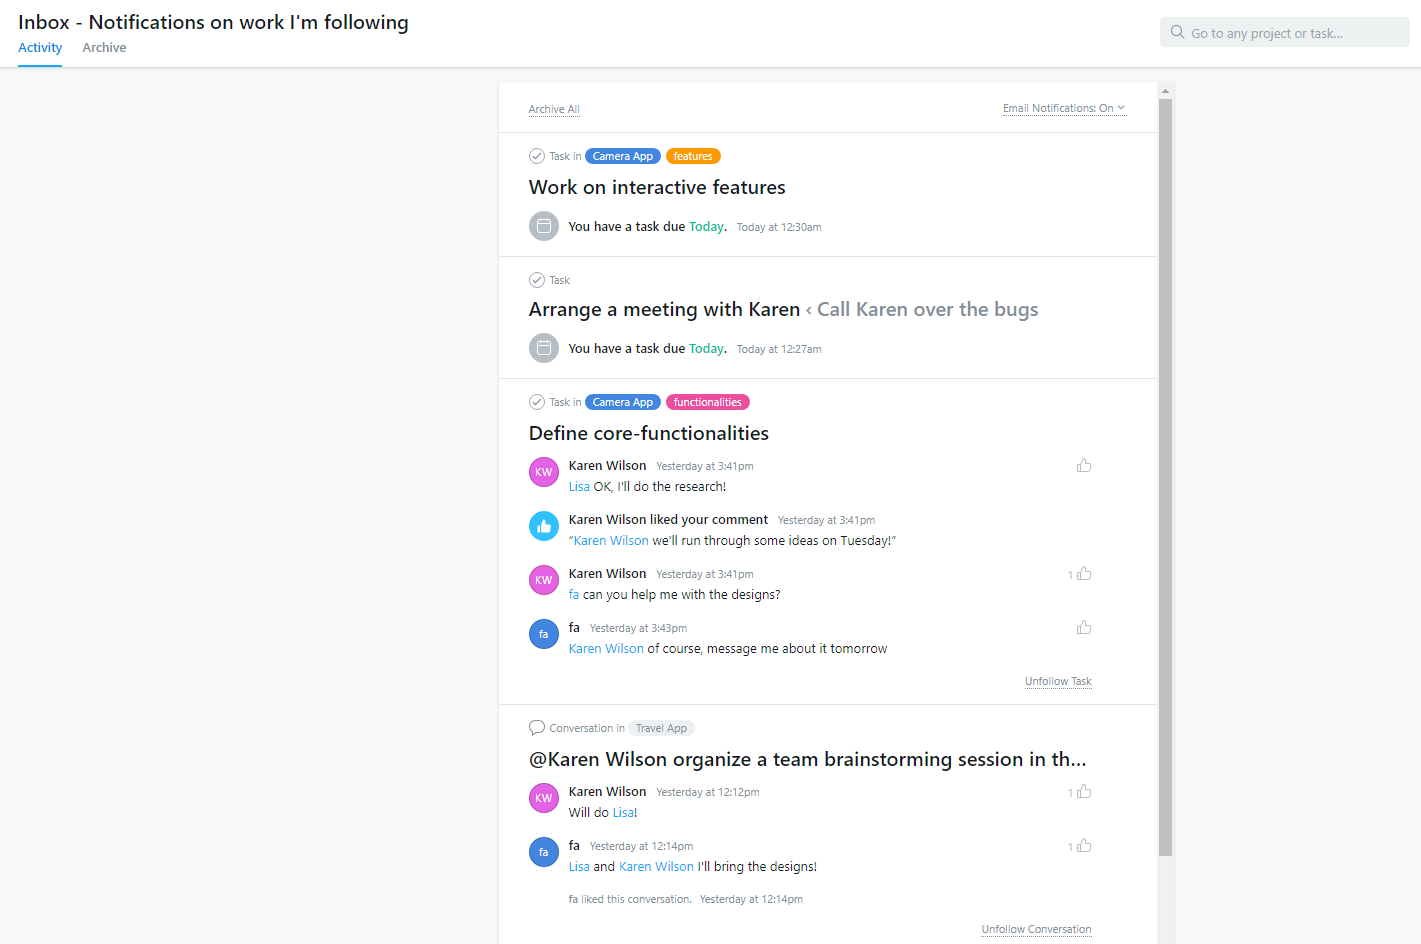
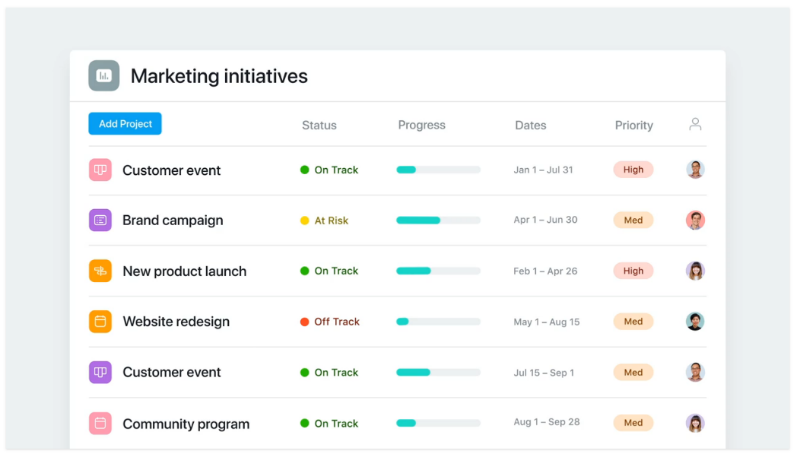
Portfolios
The “Portfolios” section allows for quick organization and view of all the projects your team is currently working on.
You’ll be able to check whether your work is on track, off track, or at risk, as well as keep track of your priority projects, and the due dates for each project.
Here, you’ll also be able to study the context of your project, follow updates on your project’s leads, as well as adjust your plans for these projects.
How Clockify for Chrome and Firefox works?
Clockify’s Browser extensions are 100% free, and you can integrate them with over 100 most popular web apps for development, productivity, business, and project management – and this includes Asana.
Once you add a Clockify extension to your preferred browser, you’ll be able to track time on Asana tasks and projects, and later edit and analyze your time results in Clockify’s Web, Desktop, and Mobile apps.
When you download Clockify for Firefox or Chrome you’ll be able to:
- start and stop tracking time for activities in just one click
- track time in the manual or timer mode
- easily continue tracking time on a time entry
- link activities you’re working on with the right projects, tasks, and tags
- define the billability status of your time entries
- switch between your workspaces in the Settings
In order to start tracking time in the Clockify extension, it’s best that you first define and set up your tasks, tags, as well as clients and projects in Clockify’s Web version – once you add this information to your account, it will immediately become available to you within the extensions, and you’ll be able to select the right projects, tasks, and tags when tracking time in an integrated app.
The Clockify extensions automatically sync with other Clockify apps you use – once you start tracking time in the extension, the timer starts ticking across your other Clockify apps, where you’ll be able to further analyze, edit, and manage your time entries.
If you equally use both browsers and download the extension for each, once you start tracking time in Chrome, you’ll notice the timer also immediately starts ticking in Firefox, and vice versa.
How to Track time in Asana with Clockify?
With Clockify, you’ll be able to track time on everything you perform in Asana and gain insights that will help you streamline the time you spend on Asana projects and tasks.
The first thing you need to do to track time in Asana with Clockify is to create a Clockify Web account. This account will serve as your base, where you’ll be able to manage your Asana time entries to the fullest.
Once you’ve created a Web account, download the Clockify extension suitable for your browser – go to Firefox Add-ons to download Clockify for Firefox, or go to the Chrome web store to download Clockify for Chrome.
Now, you’ll be able to track the time you spend on Asana in several ways:
Tracking Time on Tasks through the “Start timer” button
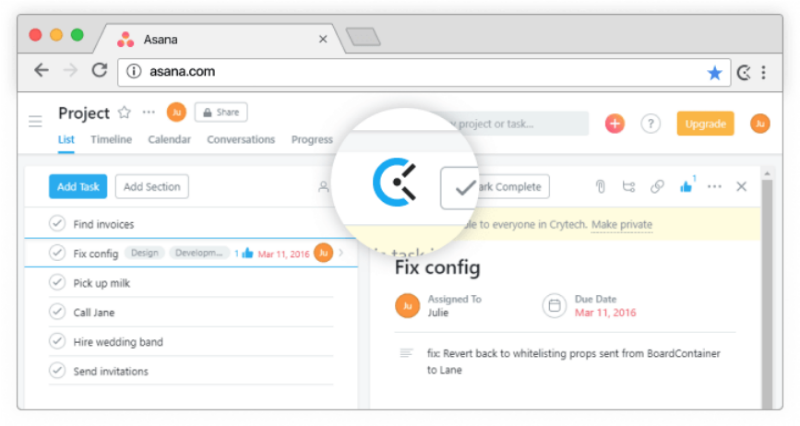
If you’re working in a Board layout, go to the “Board” tab of the app, to track time on individual tasks within your Kanban board. Simply, open a card and start the Clockify timer button, located next to the “Mark Complete” button, at the top left corner of the card.
If you’re working in a List layout, go to the “List” tab of the app, to track time on individual tasks in your to-do list. Once again, all you need to do is open a card, locate the “Start timer” button next to the “Mark Complete” button, and click on it.
This way, you’ll also be able to track time on tasks you add to your Calendar – just open a task you’ve added to one of your days, and you’ll get the same menu you get when you click on a card in the “Board” tab. And, once again, you’ll find Clockify’s extension button, next to the “Mark Complete” button.
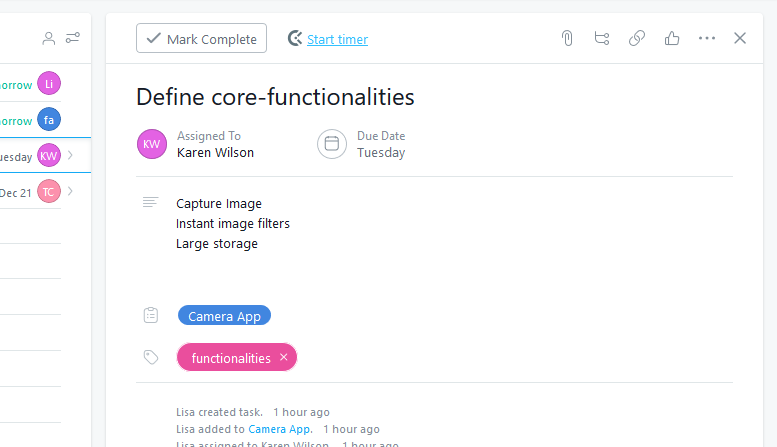
You can also track time within the “My tasks” section of the app. Once you add a new task, click on it, and you’ll open a menu on your right – where you’ll once again be able to track time through the “Start timer” button.
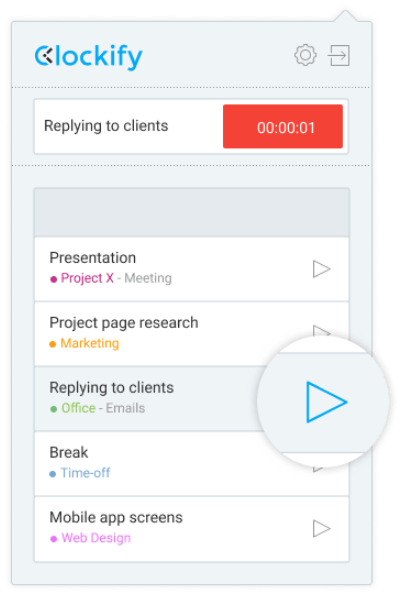
In all listed cases, once you click the “Start timer” button, Clockify will pick up the name of your Asana task, to serve as a description for your time entry, and the timer will start ticking in the extension menu.
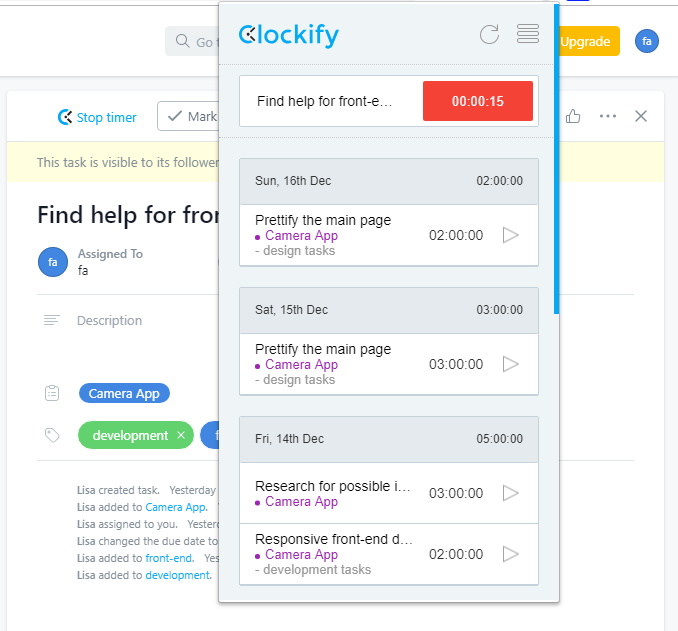
Once you’re done with an activity, simply click on the “stop” button, and the entry will be added to your list of time entries below.
Tracking time on a sub-task through the “Start timer” button
Furthermore, you can track time on a sub-task you create within an Asana task – once you create a sub-task, and click “sub-tasks notes and comments” dialogue button next to the name of the task, you’ll be able to enter the sub-tasks menu.
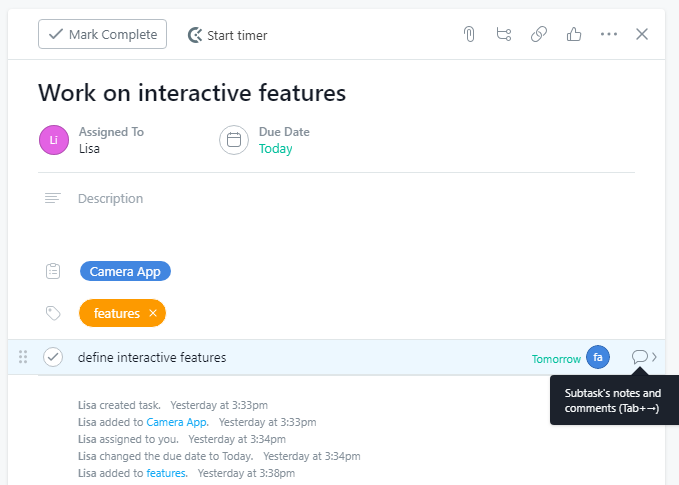
Here, you’ll find another “Start timer” button which you can click to prompt Clockify to pick up the name of your sub-task, to use as a description of your activity.
Tracking time on a group of tasks
You can also add a section that encompasses a number of to-do tasks – when you “Start timer” for a section, you’re effectively tracking time on a group of to-do items that belong to this section.

The alternative way of tracking time in Asana
With Clockify’s Browser extension, you’ll also get another simple, alternative method of time tracking – you’ll be able to track time on cards, individual tasks, and sub-tasks, as well as comments, notes, and descriptions, by right-clicking on the text you want to track time on, and selecting “Start timer with description…” in the drop-down menu.
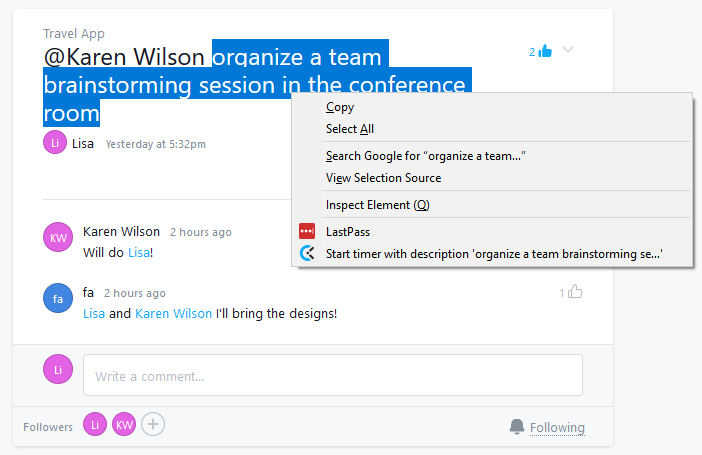
Once you do, Clockify will pick up that text as your time entry’s description, and you’ll see the timer start ticking in the extension menu, where you can also stop it once you’re done with this activity.
Managing the time tracked in Asana with Clockify’s Web account
Once you’re done with Asana activities for a time, you can go to your Clockify web account, and
- stop the timer (just like in the extension)
- delete faulty time entries
- further edit time entries, by changing their description, selecting other dates for them, or changing the amount of time you’ve tracked
- view and keep track of the clients associated with your Asana projects, if any
- generate and export Reports
- save Reports, to send them to your client or supervisor
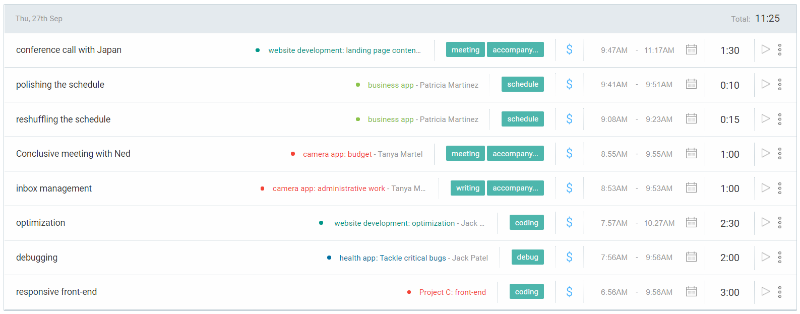
To generate and export a Report, simply select the type of Report you want (either Summary, Detailed, or Weekly Report) and filter by the project that served as you project in Asana, to get a week-by-week breakdown of the amount of time you spend on this project.
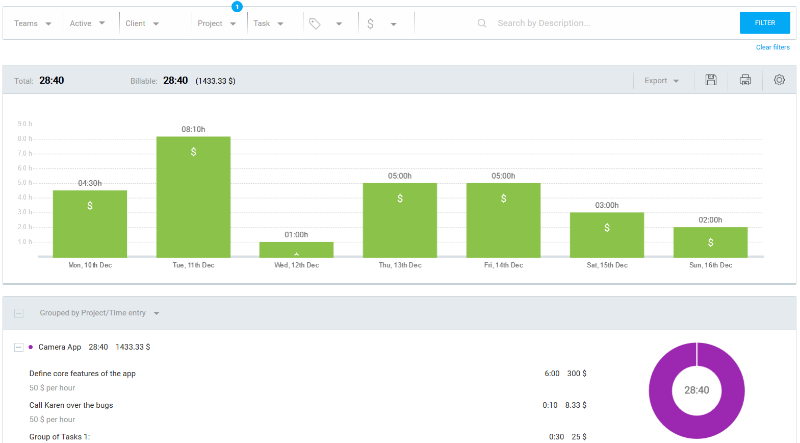
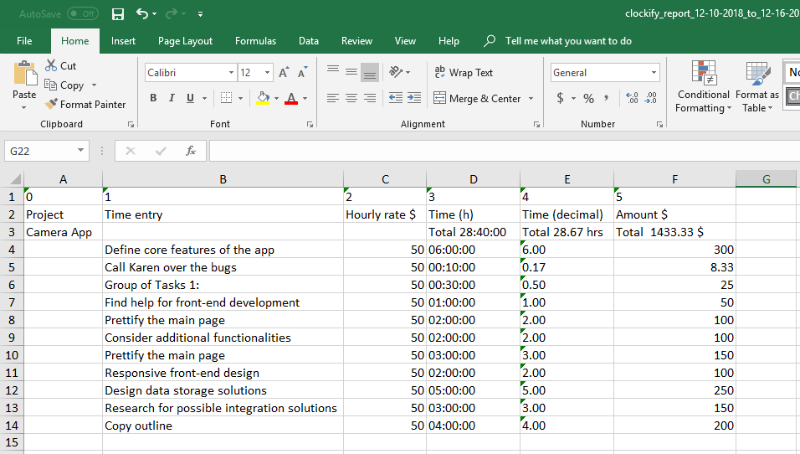
Once you’ve generated a report, you can export it as a PDF, CSV or Excel file, and analyze it further.
Or, you can save your Report, and send it via email to your client or supervisor – this way, he or she will be able to track your progress on the project you’re working on in Asana in real time.
Asana is an easy-to-use work management platform that lets you manage all your projects, and the tasks and sub-tasks associated with them, as well as collaborate with your team.
Clockify is a straightforward free time tracking software for teams and freelancers, with additional features you can use to streamline your time tracking efforts.
Together, they form a robust, but simple, user-friendly work management platform with time tracking features you can use to make sure you efficiently spend time on your projects and tasks.