I tried the Pareto analysis to learn more about efficiency
Last updated on: October 31, 2022
To tell you the truth, I was a bit anxious about including the Pareto analysis in my daily work. It’s not that it did not intrigue me — it did, which is why I decided to try it — but, the idea of going through economic terminology and jargon made me somewhat uneasy.
To get to the bottom of this enigmatic principle, I thought that I’d have to conquer some economic paradoxes and long-forgotten secrets of the trade.
Well, after doing in-depth research on the topic and having a couple of friendly chats at work, I realized that the Pareto principle is a time management technique that can easily be mastered, utilized, and applied in different fields.
Like all writers, I often struggle with mental blocks and a lack of inspiration — which is why I thought this might just be the method to help me:
- Identify the issues at work,
- Track the roots of my problems, and
- Organize my workload better.
So, I tested the Pareto principle, and here’s the account of how everything unfolded.
In this blog post, I’ll cover:
- What is the Pareto analysis?
- Why did I decide to try it?
- My account of how the analysis unfolded.
- The pros and cons, and
- The overall rating of the Pareto analysis.
Table of Contents
What is the Pareto analysis?
Suffice to say, I felt confused when I first heard about the Pareto analysis. At first glance, the definition sounded simple enough — “A statistical decision-making analysis commonly used to identify and bring attention to the crucial problem causes.”
Now, what’s the catch?
Well, the Pareto analysis further states that the majority of problems within a project can often be traced back to 20% of the causes.

In other words, by focusing on the crucial 20% of the problem causes, you’ll subsequently be able to deal with the 80% of the issues that stem from them.
Pareto analysis’ origins
An Italian economist and philosopher, Vilfredo Pareto, first observed this principle towards the end of the 19th century and named it the 80/20 rule.
Namely, Pareto noticed that 80% of the land in all of Italy was owned by 20% of the population.
After in-depth research, Pareto realized that the 80/20 distribution can be observed in the field of economics, under the premise — “No individual can be made better off without making at least one individual or preference criterion worse off.”
After his research and work were adapted by Joseph M. Juran, a management consultant, the Pareto principle and analysis were born.
What is Pareto analysis used for?
So, what is Pareto analysis used for?
Well, the general answer to this question is — decision-making. Still, there’s more to it.
A more concise answer would consist of a step-by-step process of determining important problems and learning how to address them. The ones you do address are the 20% that will lead to 80% of the project’s benefit.
The main steps of the 80/20 rule go as follows:
- Form a list of common issues and place them on the x-axis in decreasing order of occurrence.
- Count the frequency of their occurrences and display them in the corresponding percentages on the y-axis.
- Add a cumulative percentage curve across the diagram — this curve equals (frequency of occurrences) / (sum of total occurrences) * 100.
- Draw a line from the right side that starts at the 80% mark until it intersects the curve.
- Everything on the left will be your vital problems, while the right side represents 80% of the more trivial causes.
If you’re having trouble understanding this process, don’t worry — so did I until I put it all on paper and tried it out. It will all become much clearer once you go through my example.
Why did I decide to try the Pareto analysis?
While writing, you cannot possibly think about all the intricacies of the process.
In reality, when inspiration comes, a writer is capable of writing huge blocks of text without any problems.
However, once it’s time to review the text and proofread it, all the details come to light, such as:
- Spelling mistakes,
- Rashness,
- Structural mistakes,
- Improper use of punctuation marks, and
- Many other details that you don’t necessarily think about during the initial rush of inspiration.
Therefore, in an attempt to be more efficient, I searched the Internet for a way to isolate my critical errors and eliminate them to improve my writing. That’s when I came across the Pareto analysis and decided to try it.
Here’s how the entire process went down when I started analyzing my writing patterns.
Trying the Pareto analysis: A personal account
After reading through a pile of articles and deciphering a bunch of economic mumbo jumbo, I decided to jot down everything I needed to start with the Pareto analysis.
However, it didn’t take long for the first issue to come up — How will I test out this technique?
As a writer, there was no possible way to document every mistake I made, especially if I did it in the process of writing. If I spent too much time stressing over documenting every mistake and issue, it would impede my writing.
Plus, the entire process would take at least a week of writing.
So, I decided to write a blog post as I normally would, let the editor and proofreader go through the text and find the mistakes for me. This way, I’d practically have all the information I need to do a step-by-step Pareto analysis.
So, I did it, got the results back, and began jotting down the crucial information, starting with the issues — i.e. causes of my writing inefficiencies.
Step #1: Collecting the issues and counting their frequency
As I previously mentioned, the first step in performing the analysis is forming a list of the most common issues that you face.
In my case, I would wait for the editor to meticulously ravage through a text I had previously written and use the proofreading results to conduct my analysis.
Once I got through the shame of looking through my mistakes, I classified the mistakes and categorized them into 7 distinct groups that I would use for my analysis.
The groups I created were the following:
- Long sentences,
- Link issues,
- Unclear phrases,
- Unclear headings,
- Inadequate sources,
- Punctuation marks,
- Structural mistakes, and
- Problems with visuals.
Once I had my mistakes in a bullet list in front of me, it was time to move on to counting their frequency (and feel even worse).
To spare you the details of sifting through a bunch of numbers, I’ll get right to the core of the problem.
Once I counted the mistakes and placed them in descending order, the bullet list looked as follows:
- Punctuation marks,
- Long sentences,
- Unclear phrases,
- Link issues,
- Inadequate sources,
- Unclear headings,
- Structural mistakes, and
- Visual mistakes.
To make matters simpler, I converted the number of errors into percentages and then decided to visualize them using a graph.
💡 Clockify Pro Tip
If you often find yourself wondering how you wasted 8 hours at work and practically did nothing, the following blog might be what you need:
Step #2: Creating the Pareto curve
Now comes the hard part — i.e. the main point of the analysis.
The Pareto curve is used to visually represent the connection between the total count of issues and their frequency.
The exact formula goes as follows:
{Frequency of occurrences} / {sum of total occurrences} * 100
Here’s what the conversion would look like in a spreadsheet:
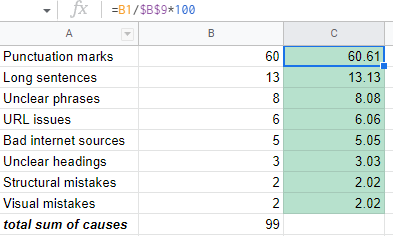
Luckily, the total sum of the mistakes I had amounted to 99, and since I’m calculating percentages, they didn’t vary from the frequency by a huge margin.
As you can see, the majority of the problems I faced while correcting my mistakes were punctuation marks — many writers’ nightmares.
Step #3: Finalizing the Pareto diagram
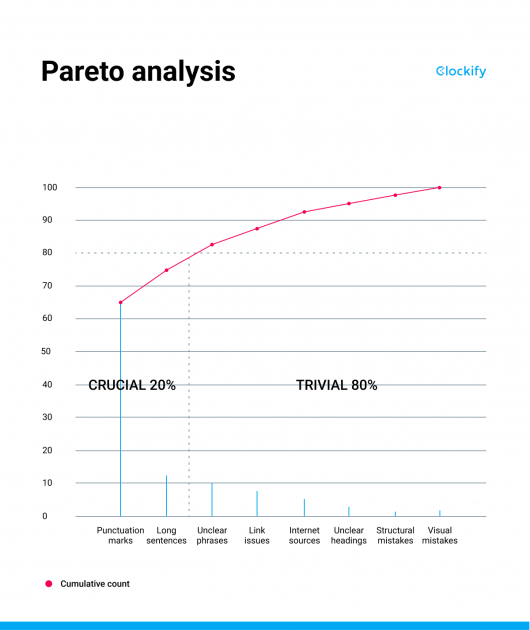
Now, it was time to finalize the diagram by creating a y-axis on the right side and drawing a straight, horizontal line toward the left. The line started at the 80% mark and stretched out until it reached the point where it hit the curve.
Then, I drew a straight line parallel to the y-axis, which created a division between the left and the right side — i.e. the results.
Everything on the left represented the 20% of the sum of all issues that were crucial, according to the Pareto analysis.
On the other hand, the right side represented the 80% that were deemed non-crucial.
The final representation looked like this:
Step #4: Analyzing the results
The first thought that popped into my mind was — That was both expected and unexpected.
I knew that punctuation marks often pose problems for me while writing. But, I had no idea that long sentences and confusing phrases had such a strong presence in my work.
This led me to go through some of my previous texts and the comments that proofreaders had left on them. Unsurprisingly, there was a pattern that coincided with my Pareto analysis.
Another interesting point is that most of the smaller and insignificant issues can be traced back to the vital ones — the top 20%.
For example, if I rush while writing, I make structural mistakes, which leads to making an SEO mistake or two, which further affects the quality of my work.
All in all, there was certainly room for improvement, and the Pareto diagram was the place to start.
The pros of the Pareto analysis
The immediate pro that comes to mind is the efficiency with which you’ll be able to conduct your work after you establish your 20%. The Pareto analysis is based on crunching the numbers and finding the problems that slow you down on an everyday basis.
For example, people who can truly benefit from this type of analysis are those that work on many tasks on a weekly basis and often encounter errors that stop them from performing at an optimal level.
Coders, developers, and project managers are the ones that first come to mind when talking about the Pareto analysis. But, evidently, writers can also find many benefits from analyzing their work and mistakes in such a manner.
Furthermore, once you get the hang of it, the Pareto analysis is an excellent tool to help you recognize where you should be focusing more of your efforts, especially during your biological prime time.
The cons of the Pareto analysis
If we exclude the time it took me to figure this principle out, it still took a couple of hours until I was able to form a complete list of all the mistakes and calculations needed to create the diagram.
Suffice to say, Pareto analysis is a somewhat time-consuming technique, and it doesn’t really make sense to rely on it if you don’t perform similar tasks and projects every day.
Still, the outcome is based on statistics, which will further lead you to make improved decisions, and will result in the better use of your time.
Personally, I do not have that many different tasks on a weekly basis, but I will definitely try Pareto on different projects as well.
My overall rating of the Pareto analysis
Although it took me a painstaking amount of time to figure it out, I must admit this technique truly works.
Writers sometimes tend to be argumentative when it comes to their work, but numbers don’t lie. Once I looked back, I realized that the crucial 20% of the problems that Pareto pointed out were the ones I struggled with the most in general.
On the other hand, the Pareto analysis can take a bit more time and effort, which is why my rating for this technique is:
FINAL RATING: ⭐⭐⭐⭐
Conclusion: Final thoughts on the Pareto analysis
Pareto is great, effective, and truly makes you wonder — How did I not realize this sooner?
I certainly recommend it to my colleagues and everyone that struggles with determining the causes that make their workdays harder.
The Pareto analysis is well-structured, organized, and undoubtedly, a unique method to improve your efficiency.
✉️ Our team at Clockify explores many time management techniques, which we often try ourselves and give our honest opinions on. If you have any thoughts or recommendations, make sure to let us know at blogfeedback@clockify.me, and we might include your input in one of your next blog posts. If you enjoyed reading this article, please share it with someone who might find it useful.